
Introduction
This tutorial demonstrates an inventory management system using Hypi’s low-code serverless back-end. To send queries to the Hypi’s server, we will use Apollo client for Angular. Is it a graphql client. This library provides many beneficial functionality grouped in layers to make the connection between a graphql back-end server and a responsive front-end. With its help, we will make queries to our back-end system to carry out inventory system transactions. This builds on my last article.
Setup
To add all the require Apollo package in your angular application, you need to use the following command in your application’s IDE terminal.
ng add Apollo-angularAfter you run this command, the installation package will prompt you to enter your graphql endpoint. At this point, you will enter the uri which is https://api.hypi.app/graphql.
When you will go through your project source, you will find that the package has automatically added a file named graphql.module.ts. This file is responsible to configure your Apollo client to connect to your required Graphql API endpoint. It will contain all the network details to establish accurate connectivity with specific headers and other necessary details.

This module has export function createApollo. It will create Apollo client using our uri and domain information along with authorization and domain. Now we will configure our headers detail in this function using Angular HttpHeaders.
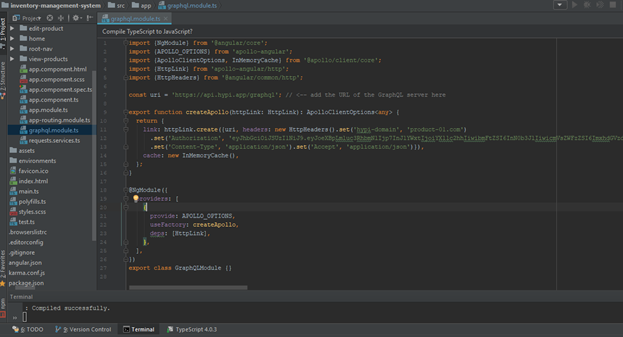
In the httpLink.create() function, we will add headers parameter and add new HttpHeaders object along with the attributes Authorization, hypi-domain, Content-Type and Accept. So, in the return statement of this function, the link parameter is HttpLink object of Apollo containing our customized uri and headers. The next parameter is cache. The Apollo client object will receive the data from the graphql server (Hypi) and store it in this cache.
File: graphql.module.ts
 import {NgModule} from '@angular/core';
 import {APOLLO_OPTIONS} from 'apollo-angular';
 import {ApolloClientOptions, InMemoryCache} from '@apollo/client/core';
 import {HttpLink} from 'apollo-angular/http';
 import {HttpHeaders} from '@angular/common/http';

 const uri = 'https://api.hypi.app/graphql'; // <-- add the URL of the GraphQL server here

 export function createApollo(httpLink: HttpLink): ApolloClientOptions<any> {
   return {
     link: httpLink.create({uri, headers: new HttpHeaders().set('hypi-domain', 'product-01.com')
       .set('Authorization', 'eyJhbGciOiJSUzI1NiJ9.eyJoeXBpLmluc3RhbmNlIjp7InJlYWxtIjoiYXllc2hhIiwibmFtZSI6InN0b3JlIiwicmVsZWFzZSI6ImxhdGVzdCJ9LCJoeXBpLmxvZ2luIjp0cnVlLCJoeXBpLnB1cnBvc2UiOiJsb2dpbiIsImh5cGkudXNlcm5hbWUiOiJheWVzaGE5MDA5QGdtYWlsLmNvbSIsImF1ZCI6ImF5ZXNoYSIsImlhdCI6MTYwMzY5MTk4MCwiZXhwIjoxNjA2MjgzOTgwLCJzdWIiOiIwMUVKR0VFREpUS1haMzhKMEo1RUQ5V1BNUiIsIm5iZiI6MTYwMzY5MTk4MH0.p5EilLvriZAQjdwE1CH5wznqLHwww6tPz1F0NWkQgqBIRlj1OBBL3R77VhthhkQlqQmg41qbfroDf01C6VJ0kd7Wq7L8NJA8l4uGL24UgxvGaZgTGZ2CFaqcBDd0TPwbqBxW0-JXgm_1K4Lqg9Ww3m57O1zFnKVFYbTAump9qdksolar_-jUFgaAWvJ2BtSJ-AecJze9HXIdwYLqEblYE3utt9qjnzZX3WLuZAbP0UcqitdQ8YXsq8cJaDcuAHYEvBKtGzjrvRDNAGLkCqtvtlKxIciJt3vX5Ptc9ZpcyUfqF_Pe4vOygRPVDd_ngSwlP6v85_Ufpxnz0LDpU9bbug')
       .set('Content-Type', 'application/json').set('Accept', 'application/json')}),
     cache: new InMemoryCache(),
   };
 }

 @NgModule({
   providers: [
     {
       provide: APOLLO_OPTIONS,
       useFactory: createApollo,
       deps: [HttpLink],
     },
   ],
 })
 export class GraphQLModule {}
Transactions
We have setup all the necessary network requirements. Next, we will move on to do the transactions on our inventory management system including fetching the current stock information, editing and updating our stock and adding new ones.
To view our stock information, we have to write find query along with all the necessary variables and fields. As we have to show all the information of each product in the stock, we will include all the fields we have in our Hypi’s back-end. Next, we need all the stock, so we will use * in our variable parameter in the query. The following will be our graphql query.
{
   find(type: Product, arcql:"*"){
     edges{
       node{
         ... on Product {
           name
           hypi {
           id
           }
           price
           total
           remaining
           comments
         }
       }
       cursor
     }
     pageInfo{
       hasPreviousPage
       hasNextPage
       startCursor
       endCursor
       pageLimit
       previousOffsets
       nextOffsets
     }
   }
 }
In our angular component where we will fetch our stock and view, we will pass our graphql query using gql function from the library graphql-tag. It is really a very convenient way to write complex queries using this function rather than writing the query manually in the typescript using JSON.stringify().
 import gql from 'graphql-tag';

 const ProductFetching = gql`{
   find(type: Product, arcql:"*"){
     edges{
       node{
         ... on Product {
           name
           hypi {
           id
           }
           price
           total
           remaining
           comments
         }
       }
       cursor
     }
     pageInfo{
       hasPreviousPage
       hasNextPage
       startCursor
       endCursor
       pageLimit
       previousOffsets
       nextOffsets
     }
   }
 }`;
Next, we will use the watchQuery() method of Apollo in our intended typescript function. It helps to fetch the data from the back-end.
File: data-table.component.ts
 private querySubscription: Subscription;
 constructor(private apollo: Apollo){
 }
 ngOnInit(): void {
   this.querySubscription = this.apollo.watchQuery<any>({
     query: ProductFetching
   })
     .valueChanges
     .subscribe(({ data }) => {
     console.log(data);
     });
 }
The querySubscription object is of type Subscription. It is imported from the library ‘rxjs’. We will pass the ProdductFetching graphql object in the query parameter in the method. It has valueChanges property which is in fact an Observable which will emit the result from the back-end.
Next, to add a stock item in the inventory, we will use Apollo client’s graphql mutation. The syntax is almost similar to query. The difference comes when we will write mutate instead of query. Let’s go to our project’s example.
We will parse mutation upsert query in the graphql document using the graphql-tag library.
File: add-product.component.ts
const AddProduct = gql`
 mutation Upsert($values: HypiUpsertInputUnion!){
   upsert(values: $values){
     id
   } }`;
Using the Apollo’s mutate method, we will add our product into our inventory. Here we have a function in the angular component named as addProduct() which will use the Apollo client to do the mutation part.
addProduct(): void {
   this.apollo.mutate({
     mutation: AddProduct,
     variables: {
       values: {
         Product: [
           {
             name: this.name,
             hypi: {id: this.code},
             price: this.price,
             total: this.total,
             remaining: this.total,
             comments: this.comments
           }
         ]
       }
     }
   }).pipe(map(data => {
     console.log(data);
   })).subscribe(result => {
   });
 }
Here, the Apollo’s mutate method has parameters mutation and variables. The mutation will contain our graphql query AddProduct and the variables will contain the product which we fetched from the front-end UI. We can analyze that how convenient and simple it is to use the Apollo to do the transactions.
The same part will be used for modifying stock details. You only need to make sure that you are providing the correct code for the product and it exists in the back-end to modify its details.
Conclusion
In this tutorial, we have done key transactions on an inventory management system built in Angular 10. The transactions are carried out using the Apollo client. First, we installed the Apollo package in our project. Then we have done the complete network configurations to connect the Angular front-end with the Hypi’s back-end server including the headers information.
Next we have demonstrated the usage of Apollo client for fetching, adding and updating/modifying the stock details. For this purpose, we have used its different methods including graphql document gql, watchQuery and mutate.
The Apollo client proves very convenient in writing the graphql queries to query the server. It helps the developer to save effort and time in writing complex graphql queries in string format in the Angular. Instead, the developer can focus on the business scenarios and make the application technically more flexible and expendable, making the code manageable.
The code is available on Github


